Search This Blog

Thursday, April 28, 2011

Shrinky Dink Fun - Dog Tags, Luggage Tags, Magnets, Keychains

Supplies:
  • Computer & Color Printer
  • Shrinky Dink Paper - get the kind below that is just blank sheets
  • 12 mm jump rings - Hobby Lobby or eBay
  • oven - toaster oven best but regular oven works also
  • clear nail polish or acrylic spray
  • scissors & 2 inch round punch
  • regular single punch - 1/8 inch
  • brown craft paper or  brown paper bag
  • magnets - use old ones and just glue it back of shrinky dink

Step 1: Find images online &/or type out information for dog tag or luggage tag
Step 2: Place as many images as possible on letter size page - don't go all the way to edge b/c paper is only
            8 x 10 (not 8.5 x 11)
Step 3: Print on rough side of paper
Step 4: Cut out using scissors +/- 2 inch punch
Step 5: Make small punch hole at top of tags
Step 6: Place in oven on brown paper at 325F until it shrinks (~2-3 min) & then remove & lay flat to cool
Note: it will curl up & then uncurl and lay flat - do not remove from oven until flat
Step 7: Paint with clear polish or spray with acrylic spray
Step 8: Attach jump rings or magnets

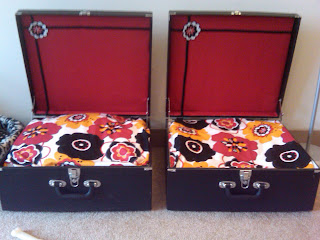
Pet Bed

Supplies:
  • Vintage case (freecycle.org, Salvation Army, Goodwill, Craigslist, ReStore) - these were new unused cosmetology cases from the ReStore
  • pillow
  • fabric
  • hot glue gun

Step 1: Hot glue fabric into top & bottom
Step 2: Cover pillow and insert
Step 3:  Cut out flower from extra material & hot glued it in the back along with some trim

Vintage Suitcase Upcycled into Pet Bed 2

Supplies:
  • Vintage suitcase (freecycle.org, Salvation Army, Goodwill, Craigslist, ReStore)
  • standard bed pillow
  • fabric
  • hot glue gun
  • drill
  • paint
  • 4 "bun" feet from thrift store, ebay or off of discarded sofa or ottoman
  • stick - almost the length of suitcase
Step 1: Pull out all lining
Step 2: Paint suitcase if needed
Step 3: Drill 4 holes in bottom and attach bun feet
Step 4: Hot glue fabric into top and bottom (under the pillow will not be seen but you need to cover any
            hardware that is visible after lining removed)
Step 5: Hot glue stick in crack to keep suitcase from closing
Step 6: Cover pillow and insert

Vintage Suitcase Upcycled into Pet Bed


Supplies:
  • Vintage suitcase (freecycle.org, Salvation Army, Goodwill, Craigslist, ReStore)
  • pillow
  • fabric
  • hot glue gun
  • fringe
  • stick - almost the length of suitcase

Step 1: Pull out all lining of suitcase
Step 2: Hot glue fabric into top and bottom (under the pillow will not be seen but you need to cover any
            hardware that is visible after lining removed)
Step 3: Hot glue stick in crack to keep suitcase from closing
Step 4: Hot glue fringe all around
Step 5: Cover pillow and insert
Step 6: Optional - add mini neck roll pillow

NOTE: Be careful in choosing any items that could be ingested by your pet (i.e. don't use fringe with beading that could be swallowed) 


Stuffed Doxie

Supplies:
  • Fabric
  • Ribbon
  • Scissors
  • Thread
  • Needle
  • Stuffing - I have some old pillows that I pull stuffing out of
Step 1: Make pattern by drawing out dog on paper and then cut it out
Step 2: Lay pattern on top of fabric and cut ~ 1 inch extra all the way around
Step 3: Sew body and stuff with stuffing then add legs & tail
Step 4: Cut out 2 eyes on black fabric or felt and 2 larger circles on white fabric or felt & sew in place
Step 4: Attach neck ribbon

Note: All sewing was done by hand but would have been much easier if done with a machine

I make dog toys using the same method - just draw out first then cut and sew!

Cat/Small Dog Bed from Old Hat Box - No Sewing Required

Supplies:
  • old hat box from thrift store - this one is leather with a zip around top that I cut off
  • fabric
  • throw pillow
Step 1: remove top of hat box
Step 2: wrap box with fabric
Step 3: insert throw pillow & tuck fabric around it + add'l piece of fabric (fat quarter size) on top & tuck
Step 4: optional - hot glue the fabric on the inside - I didn't do this

Time: 10 minutes

Dual Function End Table/Pet Bed

Supplies:
  • old end table (freecycle.org, Craigslist, ReStore, Salvation Army or Goodwill)
  • paint - I used semi-gloss black (Note: oil based paints take longer to dry)
  • paint brush (Note: if your table is not real wood - a sponge brush will work better)
  • sandpaper
  • screwdriver
  • old pillow
  • fabric for pillow (check the same places as you did for the table....old sheets are great also) or already made pillowcase
Step 1: take doors off of table using screwdriver & set aside (you may want to paint them also & reattach
            later)
Step 2: sand & paint table
Step 3: place pillow inside (you could also use to hide litter box and turn open end against wall)

Recycled Paper Wreath

Supplies:
  • old magazines
  • hot glue gun
  • ribbon
  • scissors
  • pen
  • paint - any kind
  • cardboard - from cereal box or soda can box
Time: 1-2 hours depending on how many flowers you make

Step 1:  cut your cardboard in any shape you would like - circle, square, rectangle, solid, open middle
Step 2:  take pen and draw a dot in the middle of a page from an old magazine and spiral out until you reach
            end of page (at least 4 times with distance of 1/2-1 inch wide)
Step 3: cut out your spirals and roll up fairly tight
Step 4: let spiral unroll until you get your desired rose shape - they can be different sizes or all the same
Step 5: dab the end of the spiral with a tiny bit of glue
Step 6: hot glue roses onto cardboard in any pattern you choose
Step 7: paint with any type of paint - I used acrylic (~$0.75/bottle) and painted by hand with different size
           brushes to get into all the grooves but spray paint may be quicker and easier
Step 8: After dry, make hole in top and run ribbon thru then you are done


How to make record bowls


Step 1: Place record on top of a oven proof bowl with ~9 in diameter that is upside down.
Place in oven at 200F (no higher or will give off toxic fumes) until floppy ~3-5 min

Step 2:  Flip bowl right side up and press in floppy record.
You have about 30 sec to manipulate record b/f it hardens

Step 3: Finito....do not put anything edible directly in bowl d/t potential toxins
(i.e. wrapped candy ok but nachos not)
Total Project Cost $1 if you get records from Salv Army/Goodwill/Restore
or FREE if you already have records

UCanDoThis2

Welcome to my blog about easy projects that ANYONE can do! If you have any creative ideas I would love to hear them. Thx for visiting my page.